If you use Telnet a lot and use it for TCP connections to external hosts such as Web Servers on specific ports, then this article is your best friend. This tutorial shows you step-by-step on how to enable Windows 10/11 Telnet application via Command Line, Graphical User Interface and Windows Run using simple commands. By default, it is disabled as Microsoft assumes no one uses it, and it’s not that important.
Contents
Why use Telnet in Windows 10 or 11
Telnet is a convenient client, and it can help you troubleshoot various networking problems. A great example, If you have an FTP (File Transfer) server running on Port 21 and it is not responding, or you have connectivity uses, you can Telnet to Port 21 and check if it is working and listening on that port.
There can ve various outcomes from the File Server working fine, but the Firewall and vice versa have blocked the port. Here we have a great list of software firewalls for Windows 10/11.
Common Telnet Client Problems
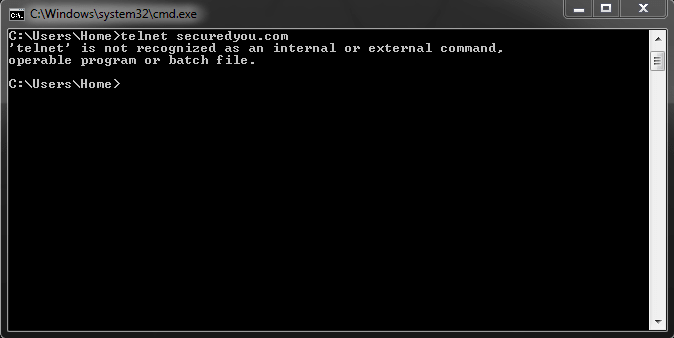
1: When you try to connect to Telnet for the first time without enabling it, you will be shown the error (telnet is not recognized as an internal or external command) below in Command Prompt. This simply means that it is not installed.
2: Make sure you enter the right domain or IP Address after typing “Telnet.”
3: There should be no space left between Telnet and (Domain/IP).
Connection Refused:
- This is the most common problem in Telnet, and the answer to this problem is to check if the Port is open in the firewall.
- Check if you are not entering the wrong addresses or maybe check that the server is listening or configured to use a custom port.
3 Ways on How to Enable the Telnet Client in Windows 10 & 11
- Enabling Telnet via Command-Line.
- Enabling Telnet via the Graphical User Interface.
- Enabling Telnet via Windows Run.
Choose wisely!
Enable Telnet Client from Command Line
This is one of the simplest and easiest methods which I will recommend.
- Go to Start Menu and search for CMD or Command Prompt.
- Now Right Click and select “Run as Administrator.”
- Now copy the following command and paste it into CMD:
dism /online /Enable-Feature /FeatureName:TelnetClient
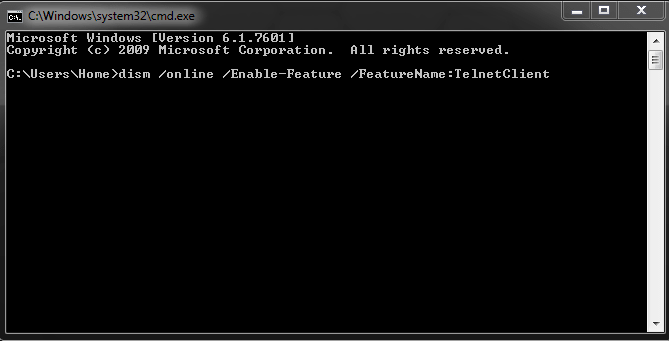
- That is it; you have now enabled Telnet for Windows 10/11.
- Not complicated, is it?
Enable Telnet Client from GUI
A straightforward method for those who do not prefer using the command line.
- Go to Start Menu, and you will need to type “Turn Windows Features on or off.”
- Once you select this option, you will have a small window open, which will say “Windows Features” titled.
- Here you will see a list of various features that can be turned on or off in Windows 10, including SFTP Client, TFTP Client, Windows PowerShell, and SMB Direct. Look for “Telnet Client” and click on the tick box on the left side.
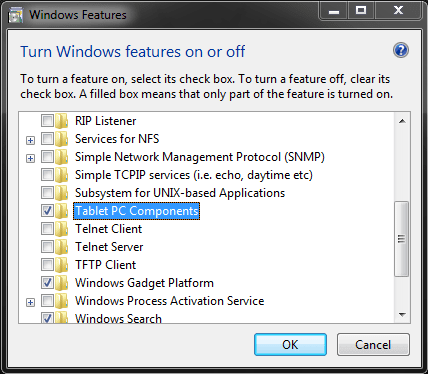
In the above screenshot, you can see “Telnet Client” under Tablet PC Components.
Enable Telnet from Windows Run
This is my 2nd favorite method, which will install the Telnet Client in Windows.
- On your keyboard, press the “Windows and R” key at the same time and release.
- This will open the dialog box for Windows Run for you. Once you see the dialog box type the below command or copy/paste it alternatively to avoid errors:
pkgmgr /iu:”TelnetClient”
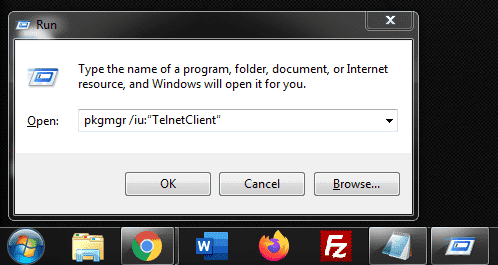
3. All done. This command will automatically install it for you.
How to Use Telnet in Windows 10/11
It’s pretty simple, here’s how to use it:
- Open Command Prompt.
- Type telnet give a space and type your domain or IP Address <space> and <Port> for example to connect.
Example: telnet securedyou.com 443.
More Useful Windows 10/11 tutorials:
- (Solved) INET_E_Resource_NOT_Found Error in Windows 10/11.
- How to Enable Automatic Sign and Login for Windows 10/11.
- How to Enable SSH in Windows 10/11 Command-Line.
- (Solved) Microsoft Compatibility Telemetry High CPU Usage.
- The Best Windows 10/11 Hacking and Networking Commands for Command Prompt.
To Conclude
I hope you have enjoyed reading through this quick tutorial and have learned how to enable the Telnet client for Windows 10/11 via 3 different methods shared above, including Command Line, Windows Rum, or GUI. Which one did you go for and why?


